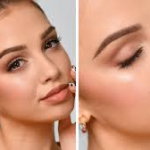
Contouring and highlighting have become essential techniques in the world of makeup, transforming our everyday looks into works of art. These techniques, when done right, can accentuate your best features and create a flawless, chiseled appearance. Whether you’re a makeup novice or a seasoned pro, mastering these skills can elevate your beauty routine to a new level. So, let’s dive into the art of contouring and highlighting with this step-by-step guide that promises to make you look like a pro.
Step 1: Prepare Your Canvas
Before diving into contouring and highlighting, ensure your face is well-prepped and primed. Start with a clean face and apply a moisturizer suitable for your skin type. This creates a smooth base and helps your makeup last longer. Follow with a primer to minimize pores and create an even surface. If you’re using foundation, apply it evenly across your face, blending it well into your skin for a flawless base.
Step 2: Choose Your Products
Selecting the right contour and highlight products is crucial for achieving a natural look. You can choose from powders, creams, or sticks based on your preference and skin type. Here’s a quick rundown:
- Contour Products: Opt for a contour shade that is 1-2 shades darker than your natural skin tone. Cream contours are great for a more dramatic look, while powders offer a softer finish.
- Highlight Products: Choose a highlight that is 1-2 shades lighter than your skin tone. Cream or liquid highlights offer a dewy finish, while powders can give a more subtle sheen.
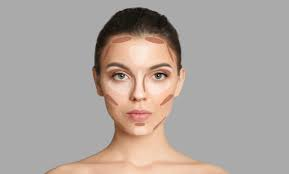
Step 3: Map Out Your Face
Understanding your face shape is essential for effective contouring. Here’s a general guide:
- Forehead: If you have a high forehead and want to make it appear smaller, contour along the hairline. This creates a shadow that visually shortens the forehead.
- Cheekbones: To enhance your cheekbones, apply contour below your cheekbones, from your ear towards the center of your cheek. Blend well to avoid harsh lines.
- Nose: To make your nose appear slimmer, apply contour along the sides of your nose, and highlight the bridge.
- Jawline: Contour along your jawline to define it and hide any double chin.
- Temples: Contour your temples to narrow your face if you have a round shape.
Step 4: Apply Contour
- Cheekbones: Using a contour brush or a sponge, apply the contour product just below your cheekbones. Blend it upwards towards your temples. Make sure the contour is well-blended to avoid any harsh lines.
- Forehead: Apply contour along your hairline. Use a light hand and blend well to create a natural shadow effect.
- Nose: Use a small brush to apply contour along the sides of your nose. Blend it well to ensure there are no visible lines.
- Jawline: Apply contour along your jawline, blending it downwards towards your neck. This will help create a more defined jawline.
Step 5: Apply Highlight
- Cheekbones: Apply highlight to the high points of your cheekbones. This will draw attention to them and give you a radiant glow.
- Forehead: Apply highlight to the center of your forehead, above your brows. This brings attention to the center of your face.
- Nose: Apply highlight down the bridge of your nose, and a small amount on the tip for a subtle glow.
- Cupid’s Bow: Highlight your Cupid’s bow to make your lips appear fuller and more defined.
- Inner Corners of the Eyes: Apply a small amount of highlight to the inner corners of your eyes to brighten them up.
Step 6: Blend, Blend, Blend
Blending is crucial for a seamless contour and highlight. Use a clean brush or a beauty sponge to blend the contour and highlight products. This step ensures there are no harsh lines and that the contouring and highlighting look natural.
Step 7: Set Your Makeup
To ensure your contour and highlight last throughout the day, set your makeup with a translucent powder or setting spray. This step locks in your makeup and prevents it from moving or fading.
Tips for a Perfect Contour and Highlight
- Use the Right Tools: Invest in good-quality brushes or sponges. A contour brush, highlight brush, and blending sponge are essential for a flawless application.
- Build Up Gradually: Start with a light hand and build up the intensity gradually. It’s easier to add more product than to remove excess.
- Lighting is Key: Apply your makeup in natural light whenever possible. This helps you see how the contour and highlight look in different lighting conditions.
- Practice Makes Perfect: Contouring and highlighting can be tricky at first. Practice regularly to perfect your technique and find what works best for your face shape.
Conclusion
Contouring and highlighting are powerful techniques that can transform your look, adding dimension and radiance to your face. By following this step-by-step guide, you can master the art of contouring and highlighting and achieve a flawless, professional look at home. Remember, the key is to blend well and practice often. With a little patience and creativity, you’ll be sculpting and illuminating like a pro in no time!